Friday, 22 November 2013

Academy Phantom update

  Hi, and welcome back to the blog.  I've been battling away with the Academy Phantom over the last week, I say battle and that's not an understatement.  Nothing to do with Academy but I'm trying to shoe horn the Aires cockpit in there and it's fought me all the way, but more of that in a moment.

  The Scale Aircraft Weathering Facebook page is growing fast, thank you to all those who have joined.  As you will see, I regularly post up reference pictures of heavily weathered aeroplanes but my library is only so big so please feel free to post your own pictures.  And not only those of the real thing, feel free to post your own models, ask questions and generally get involved, I'd love to see some more interaction on the page.

  Talking of models on there, part 1 of the Tamiya Gekko is up so feel free to stop by and take a look.  Here is the finished model;


  Now for the F-4.  If you remember this project is for Mig Jimenez' The Weathering Magazine so you'll have to wait until the Vietnam issue is released for the article on painting and weathering but until then I'll be showing you construction WIP bits as a taster.  The resin is highly detailed so will benefit from a careful paint job.  I did consider shaving off the raised details and using the Eduard pre painted bits, something I did on the Trumpeter F-100F but this time decided to have a go at painting them.  Following the base coat of grey, the relevant areas were painted white before the black was sprayed from directly above, this meant that there would be no over spray on the sides of the switches.


  Then a Flory Models skinny sanding sponge and a scalpel blade were used to highlight the knobs and dials, they were then touched up with a fine brush.  Many switches were black or had fine white writing on them so a tiny blob of Vallejo black was placed on top.


  After that, a filter using diluted AK Interactive Winter Streaking Grime was applied followed by a pin wash consisting of Abteilung Shadow Brown.  Here is the finished result, I'm quite pleased with it to be honest however I do prefer the pre painted consoles so will be using those next time.


  The instrument panels were a mix of Aires and the Eduard colour etch.  I know some say its cheating but I disagree, I think the results are stunning and in my mind is no different to using decals!


  Now for the nightmare!  There are bits of the fuselage that need to be removed in order that the resin tub fits, fine, I get that.  But I didn't expect the fight, especially as the F-100F cockpit just dropped in.  ARRGGHHHHH!  Anyway, I got there in the end but its not as neat as I would like!


  Having chopped up the fuselage I painted up the Aires resin avionics panels, even though they've come out looking really nice I wouldn't do it again, I have a repair job where I've thinned the fuselage too much!


  In order to facilitate the fitting of the nose wheel bay I had to scratch built the bay roof from really thin plastic card plus Archer rivets.  It was then enhanced with Eduard photo etch, note this is now a brass colour!  Much better than the plated stuff.


  Attention then turned to the wings, the wheel bays were tarted up with more Eduard brass.  The larger parts were tarnished so I polished them with a skinny sanding stick.


  That's how things stand at the moment.  Next week I'll be putting the airframe together and hopefully I'll be getting the painting started which I am really looking forward to.

  One last thing before you go, part 1 of my Tamiya Corsair article is in the latest issue of AIR Modeller.  After all these years I've finally managed to get on the front cover which I am chuffed to bits with as this magazine is pure modelling porn!  This part covers the cockpit and engine plus the main construction. Painting and weathering will be in Part 2 scheduled for Issue 52.


  So that's it for now.  Don't forget to check out Scale Aircraft Weathering if you haven't seen it and if you have something we could all share that would be awesome.

So until next time, all the best and happy modelling.

Jamie


Friday, 15 November 2013

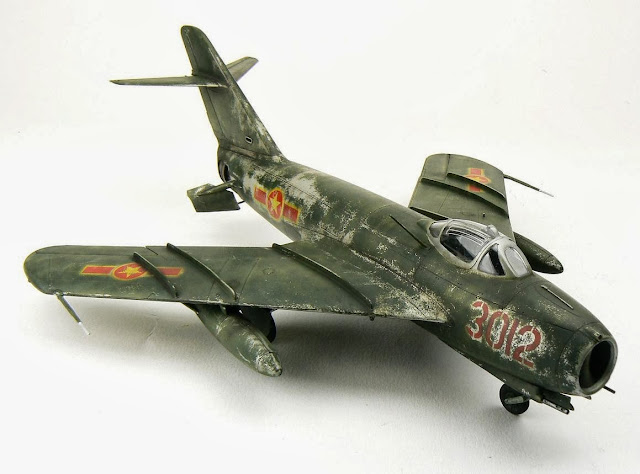
VPAF MiG finished. Telford, a personal report.

  Hi chaps.  I am so please with the response with the Facebook page.  I really am overwhelmed so thank you for your support.  I really hope this can be a fun place to talk all things weathering so feel free to post your reference pictures, models and comments and build up the database of cool stuff.


  Telford:  Wow, in my opinion this was the best year ever.  Once again the Saturday was carnage trying to get in but even though the queue was long it all moved pretty quickly and the wait wasn't too bad, that didn't stop the usual vocal dweebs on the forums complaining.  Actually, Telford was a great subject for Forum Twattery, they complained about everything from the queues to the price of coffee!

  Once again I entered the competition and once again there were the usual baffling judging decisions.  A 1:350 Shar got gold in the little class, it was shite.  proper shite!  Black painted canopy with wobbly hand painted frames, scratch bult pylons and sidewinders which looked way over scale etc etc etc, I could go on for ages!  But, according to our favourite forum it deserved to win cos it was small and a lot of effort went in!  Whatever!  Our favourite forum even came up with the classic statement that the Best in Show winner shouldn't have won because that modeller won last year, or even that it wasn't a model at all as the real thing didn't exist therefore accuracy couldn't be proven.  WTAF!!!!!  This model was quite simply the best piece of model porn I have ever seen, it almost made me weep it was so good!  Talking of dodgy decisions, I did OK myself; 2 golds, a silver plus best allied aircraft and best natural metal aircraft.  But once again I seem to have won with stuff I chuck in at the last minute because there is room in the transport box and the stuff which I thought would do really well in didn't get a bean!  It is my mission to change the competition for the better, to make it fairer and increase the credibility of judging however I am not unexpectedly experiencing considerable inertia.  But that's IPMS for you!


Sorry about the small images, I got them from the IPMS UK website.

  On to the MiG.  As you may be aware this is for The Weathering Magazine which as you saw in the last blog post is returning soon.  No doubt there are still some difficulties to be resolved but it looks like Rick and Mig are almost ready to publish the next issue which is fantastic news.  I have knocked up the Hobby Boss MiG-17 for the Vietnam special which should be out some time next year.  It's a dog of a kit, really ill fitting which is a shame as I quite fancied doing a natural metal machine however there are some fantastic examples of chipped aircraft so I went with this.  Once again Mal Mayfield came up trumps with his Miracle Masks for the markings which really help with the chipping.  Before you all shout "he's got the wing markings in the wrong place"  I know, unfortunately I followed the instructions, I must learn to check those from Hobby Boss and trumpeter as they seen to drop the ball not infrequently!


  Ok, that's it for now, next time I hope to show you some more progress on the Academy Phantom which has ground to a halt but I am all inspired from last weekend so the creative juices are flowing!  Oh, and don't forget to catch the Facebook page (shameless plug)!

  Cheers,

  Jamie


Tuesday, 5 November 2013

Scale Aircraft Weathering; a new Facebook page. MiG-17 Update.

Hi, welcome back to the blog.  I have had an idea for a Facebook page for sometime now and the other week I finally got around to setting it up!  It's called Scale Aircraft Weathering.  The idea is to promote not just weathering, but "realistic" weathering.  Too often we see aircraft models which are almost caricatures, or models of models, examples where folk have used techniques with no regard to how the real thing actually looked.  A classic example is exhaust staining on Lancasters, these have a typical pattern but people just spray light grey from all exhausts over the wing, the real thing didn't do that!  Chaps will use various techniques such as pre shading and every thing else with no reference to the real aircraft so that while it may look like a great model, it doesn't look like a miniature version of the real thing.  If that is how they wish do do things and they enjoy the process then fair enough, who is anyone to criticise?  However, I want to make models of real aeroplanes, to make something in miniature that resembles he real thing.  To that end, I hope my Facebook page can be a place where like minded modellers can post pictures of weathered aircraft for inspiration so we can discuss techniques and products.  Likewise, post photos of their models so we can all learn from each other and discuss techniques and new products.  So far it's turning out to be very popular with over a thousand "Likes" in the first week; I am totally blown away by this.  I hope therefore it can become a valuable resource.

Even if you don't have a Facebook account you can still view the page.  If you do have an account, why not pop over and have a look, even better if you wish to contribute!

https://www.facebook.com/ScaleAircraftWeathering


Onto the modelling.  I haven't touched the Academy Phantom as the MiG-17 has been taking all of my time so there is no way I'll be getting that done before Telford!  Oh well.  The MiG has been a bit of a bitch really, the fit is pretty poor and the engineering is over complicated for my tastes.  I wish they could have just done 2 fuselage halves rather than splitting it down the middle, it would make life so much easier!

Here is the nose splitter plate.  It looks really minging but I am depicting this aircraft as if it has been dumped in the corner after the war.  However, I may change my mind and do an in service machine in which case I'll "clean up" most of the grime and touch up the chipping!


This model would be a certain tail sitter even though I have missed out most of the engine!  To that end, some roofing lead was added under the cockpit tub and Deluxe "Liquid Gravity" poured in and set with ultra thin super glue in the avionics bay.


Did I mention the fit was poor!  Argghhhhh!  I dislike construction the best of times but this has been really testing, the first bout of filler was super glue mixed with talc for ease of sanding and a bit of pigment for contrast.  It then had a layer of Mr Hobby epoxy putty to smooth things out with a final brush of Mr Surfacer to be on the safe side.


The model is now almost finished.  I'm waiting for the filler around the windscreen to cure (yep, more filler!) so I can sand it, then it'll be painting time!  All the rivets have been applied but some will have to be re done as the rubbing down will wipe them out.  Bugger.  Anyway, the painting will be good fun and a good antidote to sanding dust!

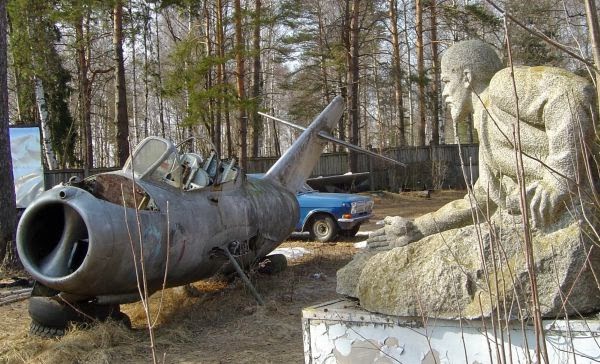
Here are some weathered MiG-17 pictures to whet your appetite till the nest update which will have pictures of the finished MiG plus a Telford show report!


Some great news, looks like Mig and Rick have sorted out the admin regarding the AK Interactive situation enough to publish the next issue of The Weathering Magazine!  This is great news, especially as its where the Mig and Phantom are destined for!  So, congratulations Mig, Rick and the team.


So, until next time, have fun and be inspired.  Oh, and don't forget to check out Scale Aircraft Weathering community on Facebook.

Jamie