
Welcome back to the blog. I am now a fully qualified Tucano instructor teaching the RAF and Royal Navy students the fine art of flying fighters albeit in a single engined turbo prop. This course is where we impart the Fighter Pilot mentality so there is some great flying to be had. In fact the other day I was intercepted by a Typhoon in the local area but having such a small turn radius it didn't take too long before I was in his 6 taking an imaginary "Fox 2" shot. Little things like that are great for the students as it injects some resolve and determination in them, something they'll need as the course lasts about a year.
If anyone is going to RIAT at Fairford in a few weeks why not stop by the Tucano in the static park. I'll be there with my shades on looking cool chatting to punters!!!
Anyway, now the course is over hopefully I should have more time in the evenings for modelling. I have progressed with the Dragon Ju-88 and the main of the airframe is complete but an awful lot of filler was needed at the wing roots. As you can see I'm using Aires engines, and the fit............?


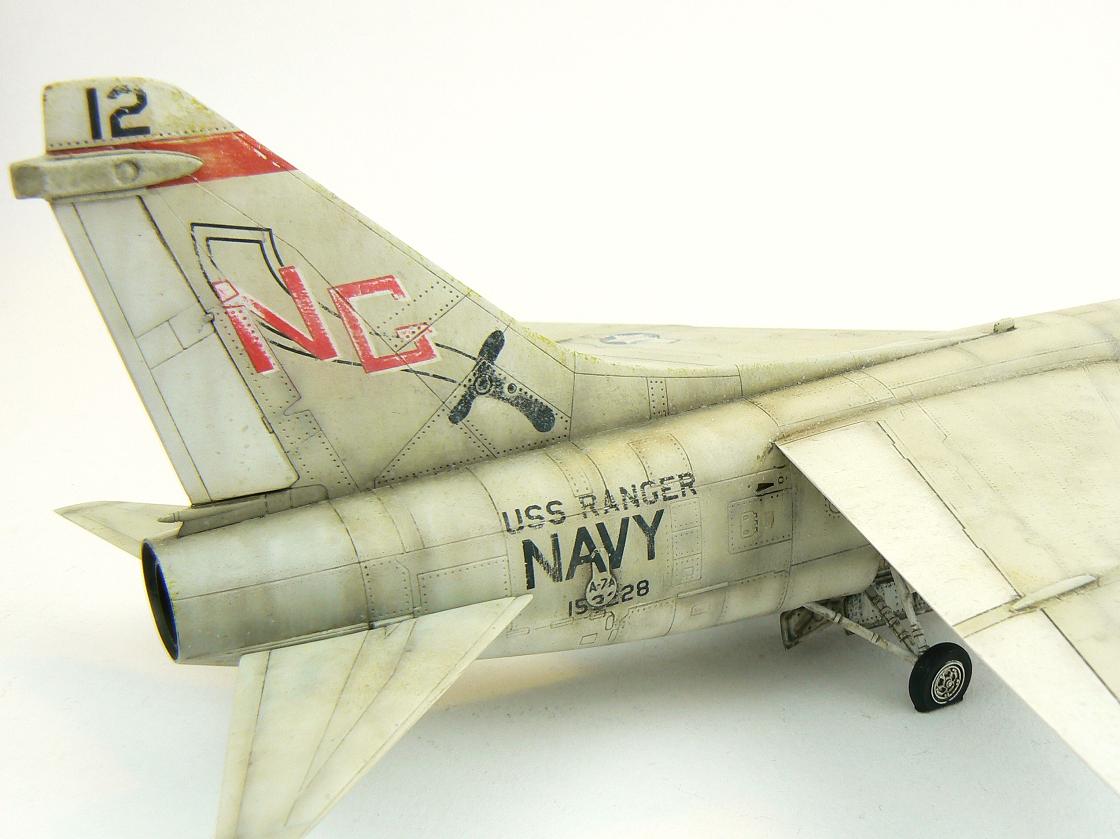
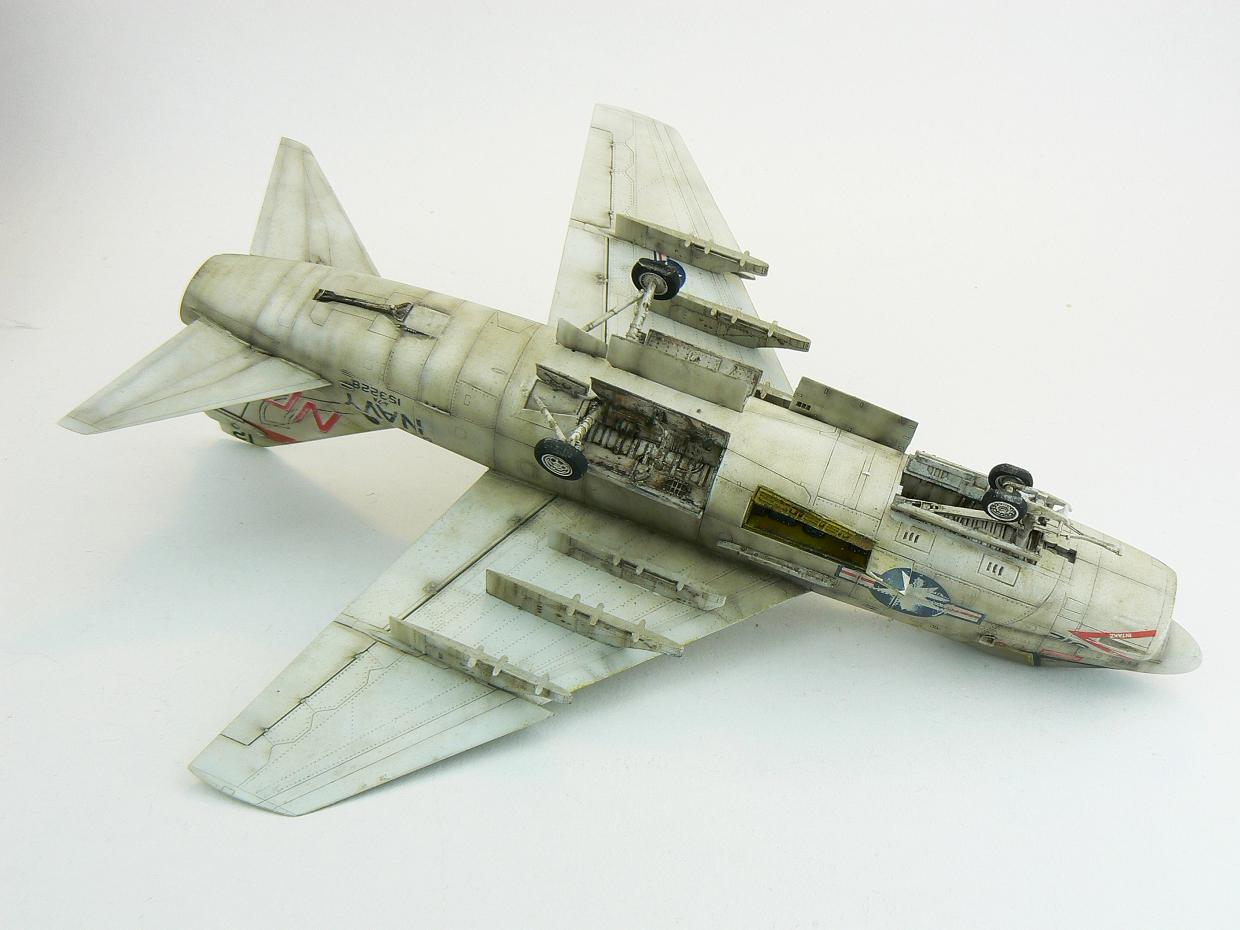
Next up is my little Hobby Boss A-7A Corsair. To be honest, I only bought this kit for the weapons for a future Hasegawa F-4 Phantom. I built up the kit as I did a painting demo during the inaugural London Model Show run by the chaps at SAM and Guideline Publications. I was intending to leave the model until Telford where I'll be presenting various weathering demos but I really needed to paint and weather something as I felt my mojo was starting to slip away with all the filling and sanding that was going on with the '88.
I wanted to depict an abandoned airframe which was slowly accumulating with dirt and grime, it's not a Boneyard bird, more of an aircraft waiting for the scrap. Extensive use of oils and AK Interactive weathering enamel products was used on this one. The decals were a bit of an adventure, I thought I'd give John Wilkes' technique for stripping the carrier film with white spirit a go. Just soak the decal then scrub with a soaked cotton bud and the film will just rub off. I've tried it with other companies decals but can only get it to work with Trumpeter/Hobby Boss decals, still, it did work so thanks John, I'll be using that in the future for sure. When dry, I took a Master Casters sanding sponge to the surface and distressed them, again, I think it worked out pretty well!
All I need to do now is make a simple base, something I'll do in the coming weeks.


To finish, here's some more work in progress, this time Trumpeter's MiG-21F-13. This is a great kit and again is being built straight from the box. I have a special finish in mind for this one but you'll have to wait until it's finished!


Righto chaps, that's it for this update. In the next installment I should have finished the base for the A-7, have the Ju-88 ready for paint and maybe finished the MiG (hopefully). So until then, may your 6 always be clear.
Cheers
Jamie
Hi Jamie,
ReplyDeleteGreat work, as to be expected! I am particularly impressed with the treatment of the wheel wells of the MIG; I figure you have gained a lot of experience of a certain technique with your latest build, the Jagdpanzer 38 Hetzer. I recognise the use of washes, filters, and chipping with a sponge, but the exact recipe for this particular effect avails me! I myself am doing a wreck diorama of the DKM Bismarck and would like to learn this effect you've achieved here. Could you explain in some detail what steps you took for the wheel wells? Many thanks in advance! BTW, as you are, I am also a member at FloryModels.
Cheers,
Jannem
Hi Jamie, I enjoy reading the blog. Clearly 'mil modelling' fora are no different to toy chuffer train forums I read in terms of participants, good and bad. Re the Corsair diorama base I model in 4mm/4ft scale primarily. If its going to be a desert storage scene a good way of doing the base will be from DAS modelling clay, (use the white). I use it on railway layouts for fine dirt and pebble roads. Use a thin layer of PVA to help fix the DAS to the base (assuming its wood) smooth the Das into very thin sheets and place them on the base. smear the sheets into one another and use a small amount of water to help the join. Once I'm happy with the profile I use a normal household paint brush and gently stipple the surface. This will give a very fine texture to it that not look out of scale and will accept washes of paints to accentuate them. They will also accept ground textures and weeds without any problem, a bit like this.
ReplyDeletehttp://albionyard.files.wordpress.com/2011/09/img_6315.jpg
Hope that helps
paul