Goodness gracious, has it really been way back in May since I last updated the blog! To be fair, I have been concentrating on pushing out the plastic, and writing. Not just for magazine articles, but also my first book which is very exciting. But just when I thought it was in the can and in the hands of the publisher, they go and ask for 2 more models for it! However, both are very cool subjects and certainly fit the "extreme" brief and it will result in a better piece of work. If all goes to plan it should be released around early Q3 in 2017 (that's calendar, not financial....! I must learn to let the day job not creep in....)
I really enjoy doing the blog and now the bulk of the book is done, I am going to aim to try and push out more regular content. I'm going to aim to avoid opinion, musings and commentary on the hobby at large. There's enough of that on social media, other blogs and forums, and that usually just ends up in blah anyway. I don't want blah on my blog, I'll leave that to others. I'd rather talk about my models, interesting new techniques, tips and hints that I come across, and new models and products I've got hold of. I'll write my thoughts on various kits I've received, but they won't always be the brand new latest release though. For example I've just got the Hobby Boss Mirage III, it arrived this morning. Looking at the sprues at a glance it's a lot nicer than I was expecting from what I've read on the interwebs and magazines.
Now onto my output for 2016. All told it was quite a good year for me with more than one a month completed on average. I've covered 1:72, 1:48, 1:32 and 1:24 even (although that was a car!).
Hobby Boss (Eduard boxing) F-14 Tomkatski 1:48.
This model had replacement Russian resin seats and replacement missiles (from a GWH MiG-29). Decals were Begemot and I tried Akan paints for the first time; they were nice but did clog up the needle often. By doing the maritime scheme I could really go to town on the weathering as some of the Soviet stuff got really quite grotty.
The premise for this was that back in the late 80's as the Cold War was thawing, an exchange programme was set up between the USSR and USA in order to increase trust and cooperation. A squadron of F-14s and F-16s were exchanged for Su-27s and MiG-29s. Various modifications were required in order to make the operation sustainable.


The article appeared in The Weathering Magazine.
Kittyhawk Bronco 1:32
Next up was my favourite model of the year... scratch that, it's my favourite model I have ever done!
Next up was my favourite model of the year... scratch that, it's my favourite model I have ever done!
I had so much fun with this one, the shackles came off and I could let rip with the imagination. The base kit is the Kittyhawk Bronco which had a full scratch detail job; many of the parts came from the Hobby Boss WMIK, engines from Aires, mini gun from Live Resin... but there's all sorts of stuff in there including miles of Albion Alloys tubing! All the markings came from Mal Mayfield's Miracle Masks, he produces custom masks to order and I'd be totally lost without him!


This model will feature in the forthcoming book.
Great Wall Hobby MiG-29SMT 1:48
Another great kit this one although not without its disasters! I ended up tipping the colour cup over the wing root destroying the paint work in the process. I let it dry, sanded it back but then had to try and match the paints as they were custom mixes, it didn't help that I'd taken out all 3 shades!


This one was done straight from the box and appeared in MAI magazine.
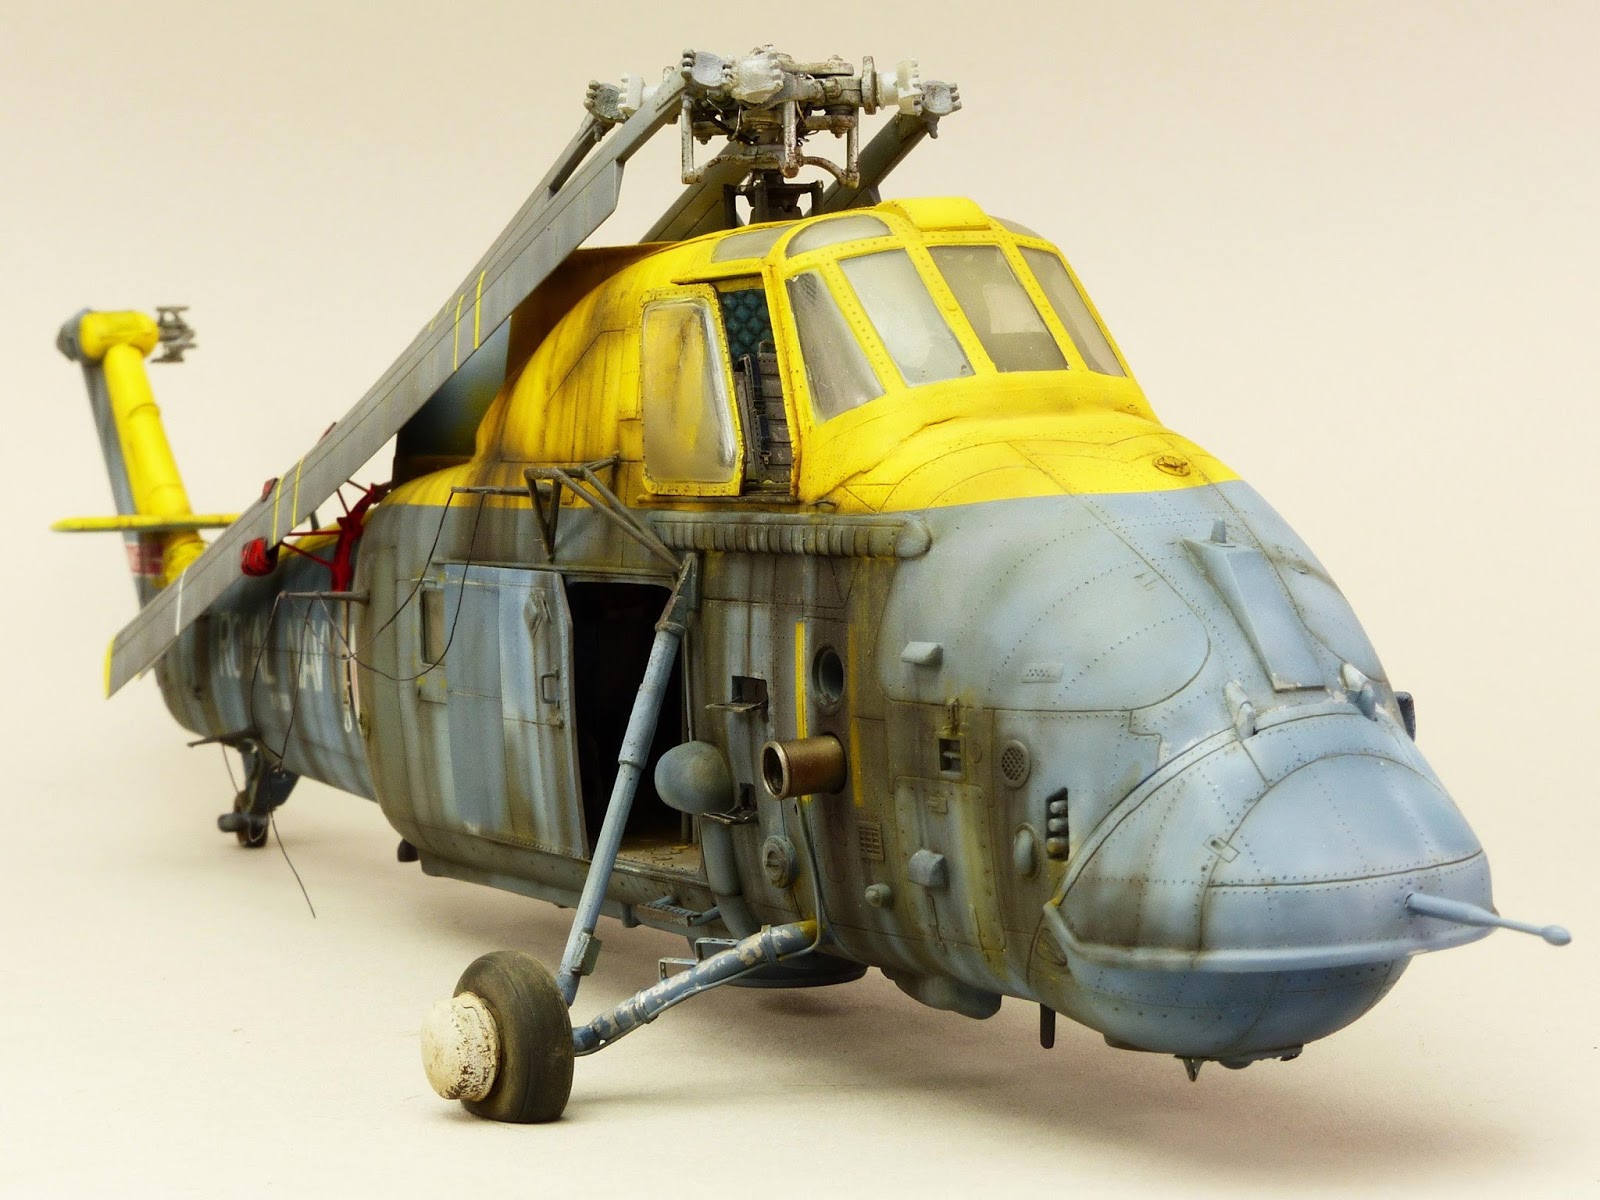
Italeri Wessex 1:48
I threw pretty much everything at this model; tonnes of photo etch, a load of scratch building, rotor fold set (Scale Warship - brilliant) and all the divots were filled in and a proper rivet job was done. A while ago I found some pictures of a derelict Wessex sat in a field on White Waltham airfield, I love trying to recreate these rotting aircraft and I just couldn't resist.


The interior of this model featured in The Weathering Magazine, the exterior SBS is in the book.
Airfix Shackleton 1:72
My good mate Shifty is a modeller but had recently moved house and the builders were in so he asked me if I could finish this off for him. His wife's brother in law's father used to fly them and had just passed away and as the builders were turning the house upside down Shifty asked if I could finish it off for him. I had to sort out all the seams and spend quite a while getting it into a position where I could paint it. Still, it was fun.


This one wasn't published.
Hasegawa Ki-44 Shoki 1:32
Being a weathering fanatic I HAD to do a paint peeling Japanese job. The Hasegawa Shoki is a lovely kit, all I did was thin and drill the seat, add a HGW harness, used Master gun barrels (how do they do that!) and rivet the airframe. Once again the markings were sprayed but this time using a Montex set. I really like these sets, especially as they include canopy masks for both outside and inside.


This model will feature in the Extreme Aircraft Weathering book.
Hasegawa Bf 109F-4
A bit of a cheat this, its an older model which received a re-paint for the book. Still, I had a lot of fun and it's a neat way of updating older models which are sat on the shelves gathering dust.


Hasegawa Bf 109F-4
A bit of a cheat this, its an older model which received a re-paint for the book. Still, I had a lot of fun and it's a neat way of updating older models which are sat on the shelves gathering dust.


Eduard Spitfire IX 1:72
What an astonishing model kit this is. The detail is incredible but not everything went to plan, the wing roots ended up too wide which I put down to me gluing the cockpit in too tightly, I'll modify that next time. Rather than the standard look I wanted something a little different so went for Techmod decals and this Egyptian aeroplane. The sheet is full of Israeli aeroplanes and I have the Brassin cockpit so will be doing another in the future. I'll also add Brassin exhausts, top cowl and the Master barrels, they are absolutely essential!


This model featured in MAI magazine.
Aires PW2800 1:48
This was a fun little project and saw a return to dereliction! The brief was to do an abandoned engine as if it was from a wreck, so that's what I did, in a weekend! Although a lovely little thing, the wiring was fiddly...

This featured in The Weathering Aircraft magazine.
Academy P-38J Lightning 1:72
Initially was a bit nervous of doing this one, I'm not particularly au fait with Academy's older stuff however I needn't have worried, this is a lovely little kit. There were no extras used, all I did was add rivets, other than that it's straight from the box, save the battle damage of course!


This is out in the brand new edition of The Weathering Aircraft magazine, Base Coat edition.
Hasegawa F-4EJ Kai Phantom II 1:72
I've always wanted to do this aeroplane. It's got all the photo etch I could find thrown at it (apart from the intake FOD guards, they were too fiddly and I failed!) plus an Aires cockpit. Having struggled with the 1:48 cockpit I was pleasantly surprised that this was an almost drop fit! Decals are Model Alliance, a rip off but the only game in town unfortunately. In hindsight I should have painted the cheat line, the decals are too narrow.


This appears in The Weathering Magazine "Real" edition which has just been published.
Revell Trabant 1:24
Anyone remember when Eduard released the first of the MiG-21s? For the marketing they did a bunny cartoon of each of the marking options, the East German was a Trabant! I've always wanted to do this as I think it's a neat project with a cool sense of humour.


Hopefully this will appear in Airfix magazine sometime next year.
Airfix Junkers Ju 87B-1 1:48
This is the brand new Airfix Stuka in 1:48. Standby for OOLAM, the chief designer asked me if I'd make the model for their trade stand, so of course I agreed! It's a wonderful kit, full of detail and innovation, it fits great and finally it looks like they've nailed the plastic and refined exterior detail. I'm still not sure on that one piece open canopy/centre section though.


This is another in the MAI pipeline.
Sword Lightning F.3 1:72
Now this did make me nervous, a Sword kit with natural metal finish! For speed and ease I used super glue for the main construction, something I'll definitely do again. Seams were made true with a coarse sanding stick, glue applied, bits stuck together, rubbed down and re-scribed all in record time. I started Saturday lunch time and by Sunday evening the gloss black undercoat was on! The package is really nice with a resin seat (no harness though so I used the mind blowing Barracuda Studios replacement) and burner cans, the latter which needed a lot of fettlting! If I was to be a bit self critical though, I think I over did the the post shading a bit, something I'll take into the next one.


Watch out for a future edition of The Weathering Aircraft for the article.
Hasegawa F-104M Starfighter F.3
Going full circle, the last model of the year was another "What-if" subject, the Hasegawa F-104 done as an RAF machine, the premise being the Lightning was cancelled in the early 1960's and when missiles were deemed a failure for the defence of the UK's airspace the Starfighter was chosen. This model had a bunch of photo etch added plus a resin MB MK. 4 seat along with Barracuda Studios' superb Firestreak missiles. Xtradecals were used with my old squadron markings, I love that red tail.


This should be in MAI in the future, along with it's wingman!
Summary
So that was 2016. The year I did my favourite ever model, the year I made a Sword kit and discovered they're really nice, the year I used super glue for the main construction and that it is awesome, the year I tipped paint and thinner all over a model with custom mixed paints!
All in all, I had a lot of fun. But 2017 is shaping up to be very exciting. The book is coming out, I've got a new job (going back to fly fast jets which is super exciting) and lots of very cool new projects. I may even start posting more regular blog updates! And hopefully, I'll make a few more shows, including Telford. First up though, there's a derelict helicopter to paint!
Have a great Xmas, new year and a fun and productive 2017.
Jamie