Wednesday 26 December 2012

RNZAF Hasegawa P-40M: Part Six - Painting 2

I hope you all had a very nice Christmas day and the big man brought you what you wanted.  To be honest, I'm yet to receive my modelling moral package as we travel to the inlaws the day after tomorrow.  I got some really nice "civilian" presents though, a North Face jacket and a posh coffee machine were the highlights.

I've managed to snatch a few hours in the cave so I thought I'd bring you up to date on the projects before I shoot off down south with the family for a few days.

Chipping continued

Even though I was pleased with the results of the chipping, I wanted to do some touching up.  Although using the AK Interactive Worn Effects fluid gives a measure of control, a small brush will give some really nice results.  Using a 4/0 brush and some Vallejo Steel mixed with some White to kill the shine, small bare metal chips were painted on, also, some dark green chips were painted as well to give even more depth.


There were some white theatre markings to be applied.  The relevant areas were masked off, AKI Worn Effects sprayed on and then Tamiya Matt White.  You'll note I went a bit mad with the masking but I didn't want to risk any over spray!


Once again, water and a stiff brush were used to remove the paint.


Now for the national markings.  It is important to seal the work so far with varnish or you'll risk lifting up the paint as the vinyl can be quite sticky.

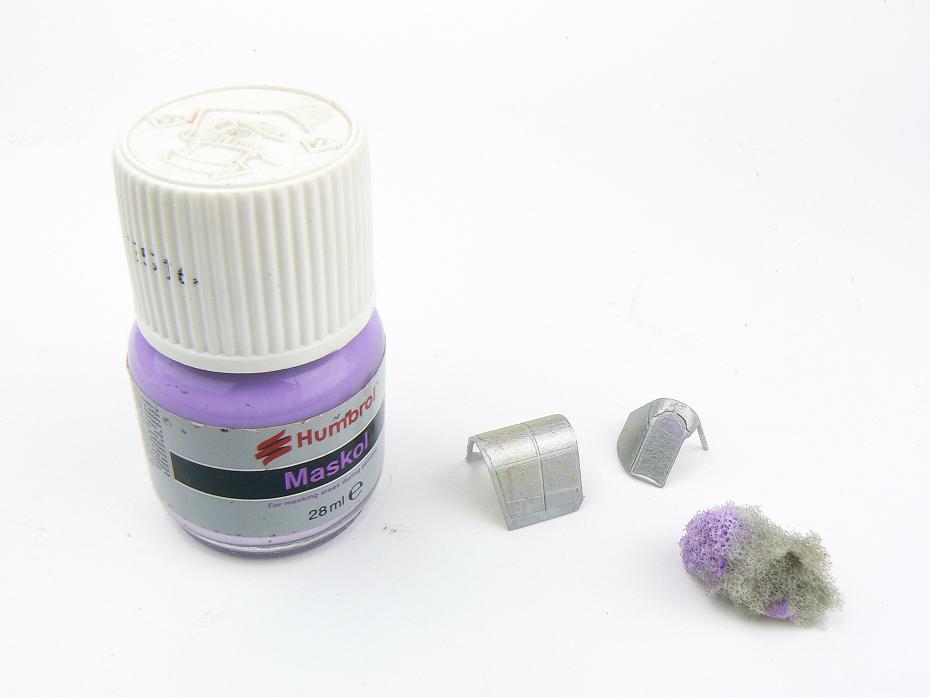
I bought some custom masks from Ad Astra in Canada, Ian is very good and the masks are superb.  I think a picture says a thousand words so have a look at the photos for the order of events.  One thing I will mention is I find it helps to seal joins with Humbrol Maskol to ovoid thin ghosting lines.

Maskol was applied first for a chipping effects.


The Maskol was then removed and a thin mist sprayed over the top.


Using a scalpel blade, further chips were applied.


The underside roundels were left pretty much intact.


looking at original photographs, some of the panel lines seem to have been resprayed with a darker paint.  I assumed these were dark green so these were added.  Also, the windscreen has been glued inplace as has the rear quarter light bracing strips.


And that's where we are at present.  When I get back from the break I'll be starting on the oils and filters.  So until then enjoy the rest of the holidays and I'll see you soon.

Monday 24 December 2012

RNZAF Hasegawa P-40M: Part Five - Painting 1

Welcome back to the blog and Part Five and what is my favourite part of modelling, the painting stage.  This very weathered scheme calls for an extreme technique and it's back to the good old hairspray method.

Preparation

The airframe has been assembled but I glued on the alternate windscreen to act as a mask.  Tape has been used for the cockpit opening and also the engine insert and the resin cowling tacked into place.


I mentioned last time that there is a noticeable join between the spinner and the back plate.  Using superglue mixed with talcum powder as a filler, this was sorted out.


I also hacked up the windscreen and canopy to simulate missing panes of perspex.  The area was chain drilled and then scalpels and sanding sticks were used in order to tidy things up.


Undercoat

The model was the sprayed with Alclad Aluminium, this will act as an undercoat.  For the hairspray technique to work a coat of matt varnish is needed otherwise the smooth finish will cause the subsequent paint layers to "wipe off".  Once this matt coat has dried (I use a hair dryer to speed things up), a thin coat of  AK Interactive Worn Effects thinned with water is misted on.  It is important to thin this product with water as it's a bit too thick as it comes out of the bottle.


For delicate areas such as the canopy the hairspray technique won't work therefore we have to use something else.  I find Humbrol Maskol to be an effective way of reproducing chipping in these sorts of areas, as long as it's applied by sponge that is.  I find it works best if the excess Maskol is dabbed off otherwise you'll get blobs and this is not the effect we're after.


Painting the second coat

Now for the undercoat.  Many P-40's serving with the RNZAF underwent repainting at some stages in their career, in many of the photos I have seen this first paint job is revealed underneath the peeling top coat so I decided to try and reproduce this.

The first layer is the Dark Earth.  I lightened Gunze's colour and added some red and yellow as the colour pictures indicated a pinkish hue.


The next coat is more straight forward, Gunze's Dark Green.

Now for the fun part.  The model is dampened with water and a damp brush is used to scrub away at the paint.  The chipping fluid (or hairspray) will eventually dissolve and thus the dry top coat will break away and form chips.  Don't panic if nothing happens for a few minutes, it will, just be patient.

As you can see, I kind of went a bit mental with this but it was intentional as we'll see in a moment.


Camouflage

This was sealed with more matt varnish and then another coat of the AK Interactive Worn Effects was misted on.  When dry a coat of foliage green was applied using a mix of Gunze colours.  This was faded as you can see in the photos, I used some Tamiya XF-4 Zinc Chromate first and then some Deck Tan.  The Zinc Chromate will lighten the green but it will keep it's chromatic richness, the Deck Tan will bleach the green.


Once again the airframe is chipped using water and a cut down brush.  You can see the effect of the undercoat, we have bare metal chips as well as chips revealing the undercoat.  Again, this is sealed with matt varnish.


An that's where we are.  I'm going to leave things for a few days as the markings will be sprayed next and when doing this technique quite often the masks and tape pull up the paint.  A few days off will let things properly cure.

It just remains for me to wish everybody a very merry Christmas, I hope the big fat guy in the red suit brings you all the plastic, resin, photo etch and other stuff you wanted.

Cheers,

Jamie

Saturday 22 December 2012

RNZAF Hasegawa P-40M 1:48: Part Four - Construction

Hello again and welcome back to part four.  In this post I will detail the airframe construction.  The project is really moving along and it won't be long before I can start painting.

Wings

I decided to tackle the wings first but before they could be glued together the photo etch for the wheel wells needed to be added.  These parts add some nice scale effects but in order for it to work properly significant amounts of plastic needs to be removed.  The areas were chain drilled before the insides were hollowed out, this will keep the structure rigid and provide some gluing area.  You'll note I've painted them green, that's only because I had some left over when I did the cockpit.  As you can see, I later painted them silver, in this case Vallejo Model Air Steel.


In keeping with the theme, I decided to do some scratch building and damage to the fabric ailerons.  As with the rudder (see part One), the plastic was thinned heavily from the inside and the structure built up from plastic strip.


The spinner has an obvious join which I wanted to remove, to be able to do this the propeller blades need to be separated from the centre part.  This was done using a fine saw and then holes were drilled to take metal pins which will secure them later after painting.

A small panel in the wing root had been opened up therefore to avoid a see through look a thin piece of plastic card was glued onto the roof of the wheel well and painted zinc chromate.


Propeller


Fuselage

The Quickboost engine will slot in nicely however before this the securing flanges were fabricated from plastic strip which was drilled out and then glued in place.  Some of the fuselage was also drilled out.


Airframe

Here are the components of the airframe.  These will be glued together tomorrow, there will be a few minor gaps but check out the next installment to see how good or bad it turns out.  


As I just mentioned, the next installment will go through the airframe construction but also clear parts plus the Eduard photo etch flaps.  So until then........

Wednesday 19 December 2012

RNZAF Hasegawa P-40M 1:48: Part Three - Engine

Thank you very much for all your feedback over the last few days, I hope I answered all your questions adequately.  Today is just a short update as I've been dragged out Christmas shopping by the other half.  Women just don't get it sometimes!

Engine

As I mentioned in Part One, I'll be using the Quickboost engine insert for this model.  It's a great piece of casting and I had planned to show it off on both sides however it has a false floor and I was afraid that opening up both engine cowlings would allow too much light in and it would look obvious.  So, one side it is.

After priming with Aclad Black lacquer primer, the engine and bulkhead were painted with Vallejo Model Color acrylics.  These brush paint very well and a few thin coats were all it took.


All that intricate detail is lost as the black is very dark, so in order to bring this out and impart a metallic sheen, the entire piece was dry brushed using Vallejo Model Air Aluminium.  I did take care to avoid the braided hose however, this will be dealt with later.


 The next event is to impart a grimy engine feel and for this I turned to the ubiquitous AK Interactive Winter Streaking Grime.  This tone is perfect as it will highlight the details and impart the oily well used look I was after.  It's too thick as it comes therefore it was thinned with white spirit.


If this was a normal service aircraft I probably would have left it at that however this is an abandoned aircraft in a scrap yard and therefore a bit more needs to be done.  To give it a dusty, dirty feel AK Interactive Dark Earth pigment was dabbed on with a dry brush.

 Next up was some spilled oil, again turning to AK Interactive, their Oil Effects was diluted and flicked onto the engine using a brush.


 Lastly, some Warpigs Olive Green pigment was applied sparingly.  Moss and lichen will start to grow on abandoned pieces, especially damp oily engines.

Also, I have added some more engine bearer supports and a little wiring to lift the detail still further.  And that's the engine done.
 

Before I leave you, Airfix have just announced their new releases for 2013.  http://www.airfix.com/airfix-products/new-for-2013/  There are some absolute gems in there although I have vowed not to buy or get any new kits in the whole of 2013.  My stash is pushing 50 or so and I want to make a big dent in it next ear so despite the temptation (the Revell Royal Navy Lynx Mk. 3 being at the top of the list) I am going to abstain.  It will be hard but I am determined to complete some projects I have got in my head first.

OK, that's it for Part Three.  In the next installment I'll be closing up the fuselage halves before working on the wings.