Sunday 22 December 2013

2013: A year in modelling review

Welcome to my review of 2013.  My output has been a little bit down on most years, this is mainly due to my job change moving from instructing on the Grob Tutor elementary trainer to the Tucano basic fast jet trainer.  This meant a 3 month conversion course which obviously had an impact on modelling time, also it meant I no longer lived at home during the week therefore weekends became very precious for family time.

It was a year of firsts and new opportunities.  I went to Euromilitaire for the first ever time which as a thrill, especially as the Hetzer won a commended (she also one a Gold at Telford which was another first for me as I've never managed a gong in the AFV classes there before).  I also set up the Scale Aircraft Weathering Facebook page which has exceeded my expectations in a massive way, I thought I may get a hundred or so "Likes" in total from modelling friends but we're at almost 1700 already and growing fast!  That in turn has led to some other opportunities however I am sworn to secrecy so I'll leave that announcement to the appropriate time!  I know, teasing or what!!!!

Ok, enough pre amble, on to the models of 201 in order of completion:

Hasegawa P-40M  1:48

This was my first completion this year and was also my first article in Art of Modelling magazine (the engine also featured in The Weathering Magazine).  I think its fair to say I had great fun with this one and threw pretty much every bit of after market I could find at it as well as having a go at scratch building and even a small vignette!


Tamiya P-51B 1:48

This model was built straight from the box.  I painted her in the scheme of Princess Elizabeth as this was a gift to a friend of mine who rates this aircraft as his favourite of all the warbirds he has flown (I know, jammy git or what!).  I wanted to depict it how it appeared during it's wartime service hence the weathering!  I used some old Aeromaster decals which were inaccurate so I ended up hand painting some corrections!


Tamiya Opel Blitz 1:35

I had a lot of fun this one.  I used Lion Roar photo etch and Mig Productions resin tarp.  It was the first time I had done a dusty desert vehicle so I learnt alot about tempering techniques to suit this arid environment.  This one featured in Scale Modelling Now internet magazine.


Trumpeter F-100F Super Sabre 1:48

This model was done for Model Airplane International magazine and to make it a little different I decided to go with a Danish example.  I also through a whole bunch of after market stuff at it however I did also do a lot of scratch detailing and conversion work.  The scheme was great fun to do, the heat pattern on the rear was a challenge but I got there in the end!


Tamiya Jagdpanzer 38 "Hetzer" 1:48

I had great fun with this one and again it included a number of firsts for me; first go with a primer red finish, natural weathered steel and sprayed markings on an AFV).  I took it to Euro and managed to get a commended which was a thrill, it also got Gold at Telford which meant I broke my duck there.  However, feel free to look back at other blog entries for my views on that particular competition!  This will appear in Art of Modelling next year some time.


Hobby Boss A-7A Corsair II 1:72

This was an interesting model.  Built straight from the box, I used it as a canvass to try out some new techniques for an abandoned aeroplane.  After a tip off from John Wilkes, I removed the carrier film from the decals by rubbing with white spirit, they then had a sanding sponge rub them to produce the chipped worn effect.  I'm calling this technique a success.  It was then weathered with filters and oils in my usual way.


Trumpeter MiG-21F-13 1:48

Once again I returned to the abandoned theme for this model.  Again it was constructed straight from the box but I found a series of really neat photos from a Polish museum where scores of aircraft are in open air storage with predictable results.  This model drove home the point that it is extremely important to study pictures of the real thing and not to blindly use techniques just for the hell of it!  This will appear in AIR Modeller in 2014.


Dragon Junkers Ju-88A-4 1:48

I normally don't like building models, and this model reminded me why!  I find all the detailing, filling, sanding and restoration of surface detail very tedious indeed, and with this one there was an awful lot of that going on!  Anyway, the painting and weathering more than made up for it!  This will feature in The Weathering Magazine some time in 2014.


Tamiya F4U-1 Corsair 1:32

This is my kit of the year, it was a stunning model to build which after the Ju-88 was a really nice refreshing change.  I really went to town on the subtlety of the weathering despite it being quite heavy but again I wanted to go with realism rather than follow all the usual clichés!  Part 1 is in the current issue of AIR Modeller, part 2 detailing the finishing will be in the next issue.


Hobby Boss MiG-17 Fresco C 1:48

This was another model inspired by a photo, I wanted to replicate the chipping and weathering I saw as accurately as possible.  As for the construction, well, it was a major pain in the arse.  The fit wasn't that great and I needed to do an awful lot of filling and sanding.  Ideally I wanted to do a natural metal machine but very quickly I decided not to!  Another one destined for The Weathering Magazine in 2014, look out for the Vietnam special issue.


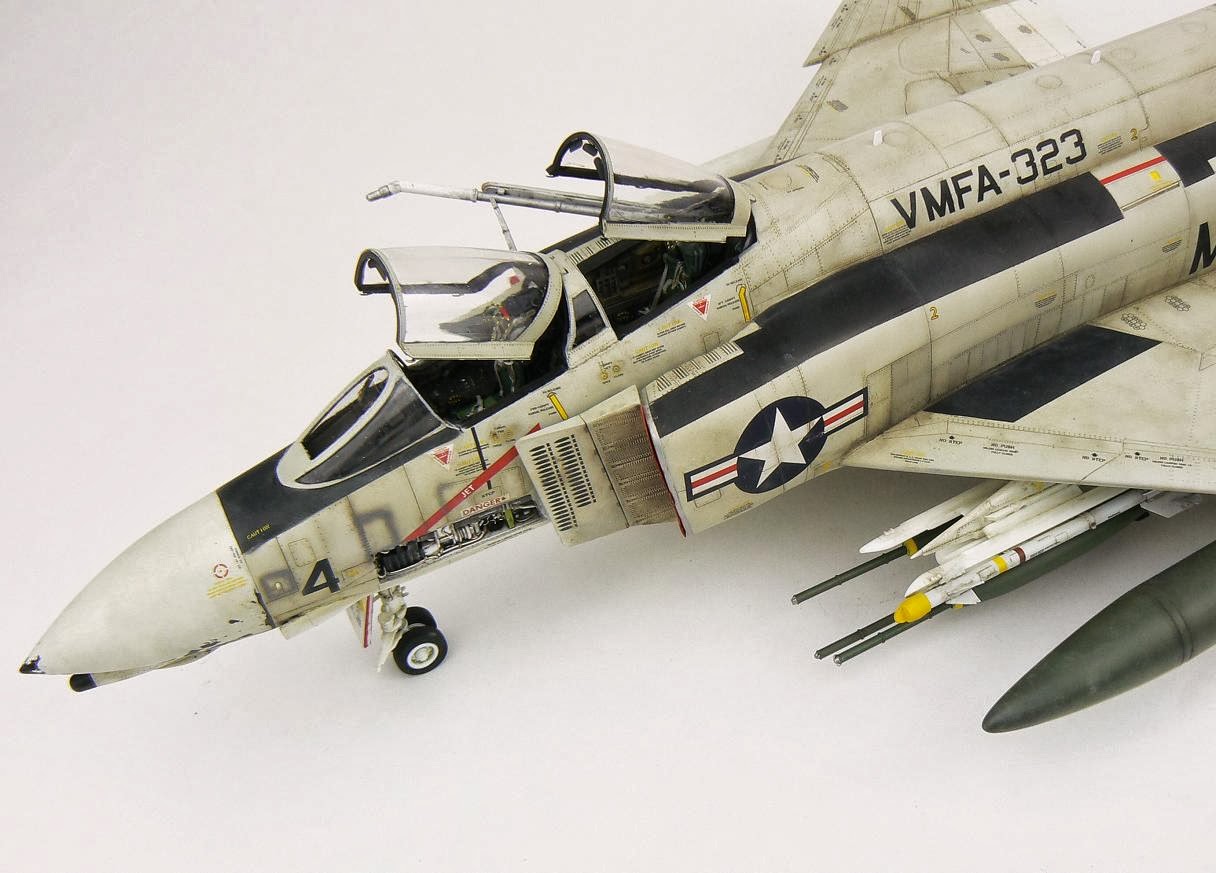
Academy F-4B Phantom II 1:48

Another one which the construction turned out to be a pain in the rear although this was all down to me trying to shoe horn in the Aires cockpit and electronic bays.  If I do another I think I'll not bother and look elsewhere for detailing.  As with most of my models, I had intended to spray the markings using Miracle Masks however I made a cock up with the dimensions and as I had a deadline I needed to use the decals.  The verdict, kit decals beautiful, better than any after market!  CAM decals, brittle and difficult so I'll not use them again!  This is another model destined for the Vietnam issue of The Weathering Magazine next year.


So that's it, 2013 almost done.  So what for 2014?  Well, next up will be a 1:32 Hunter with a load of goodies in Swiss markings, a really cool Wessex for Art of Modelling magazine to start with.  I've also got a rather important assessment at work which is going to take up 4 months of hard study which will mean a drastically reduced output until its done.  I'll still be whittling away but only a little bit here and a little bit there.

I wonder what the manufacturers are going to bring us?  I know lots of people are excited about Airfix's schedule, not me though!  The HK Models Meteor looks interesting but I'd rather a night fighter, hopefully we'll see that at some stage?  I am looking forward to seeing AFV Club's F-104 though, I have a feeling its going to be far better than the Italeri kit, we'll see though.  No doubt Trumpeter and Hobby Boss will be exciting, there seems to be no stopping them!  All in all I think in modelling terms its going to be a great year for new stuff.

I hope you all have a wonderful Christmas, a happy New Year and a prosperous 2014.

Jamie

Friday 20 December 2013

Academy Phantom, plus a fun day in the office!

Hello again and welcome back to the blog.

Last year I was very kindly invited over to Putte in Belgium for the BSMC show.  I had to work for my board and lodgings and did a demo which was fun.  They filmed it (for a live feed in the main hall) and have just put it on YouTube so if you want to see it feel free to watch.  Haggis on the telly!

Well, the Phantom is phinished!  The construction of the model turned out to be a bit of a chore to be honest, I don't really like this bit of the process anyway and this was a bit troublesome.  The cockpit was a bit of a nightmare to fit, the electronic bays were a bit of a struggle too and I was a bit surprised to find the plastic bits had fit issues as well.  The forward lower fuselage wasn't the best fit underneath, the intakes needed a bit of work and the metal tail areas were too wide!  Anyway, nothing that a little bit of old fashioned modelling skill couldn't sort out but it was annoying nonetheless.


But even though the building of the model wasn't all plain sailing, the painting and weathering more than made up for it.  This was a lot of fun!  I decided to incorporate lots of weathering based on the many photos I found of USMC Phantoms in Vietnam, the vast majority of photos I found had quite clean aeroplanes however a few got really filthy!  I needed to work out the best plan of attack and work out how I could recreate the effects I could see in the pictures as I wanted this to be as authentic and realistic as I could. Now for the tease bit, you'll have to wait for the Vietnam  issue of The Weathering Magazine to find out how it was all done!


Unfortunately, that's going to be it for modelling for a little while.  In April I've got a very important assessment at work, something which is going to take 4 months of serious study so modelling output will be slow.  I'll still be whittling away however progress is going to be drastically reduced.

Talking of work, below are some pictures of a 9 ship we did for a recent graduation.  The routine is quite good and whilst we're no Red Arrows it is great fun as you can see!


Ok, thanks for watching, listening, reading.  See you next week for my personal review of 2013.

Cheers,

Jamie

Friday 22 November 2013

Academy Phantom update

  Hi, and welcome back to the blog.  I've been battling away with the Academy Phantom over the last week, I say battle and that's not an understatement.  Nothing to do with Academy but I'm trying to shoe horn the Aires cockpit in there and it's fought me all the way, but more of that in a moment.

  The Scale Aircraft Weathering Facebook page is growing fast, thank you to all those who have joined.  As you will see, I regularly post up reference pictures of heavily weathered aeroplanes but my library is only so big so please feel free to post your own pictures.  And not only those of the real thing, feel free to post your own models, ask questions and generally get involved, I'd love to see some more interaction on the page.

  Talking of models on there, part 1 of the Tamiya Gekko is up so feel free to stop by and take a look.  Here is the finished model;


  Now for the F-4.  If you remember this project is for Mig Jimenez' The Weathering Magazine so you'll have to wait until the Vietnam issue is released for the article on painting and weathering but until then I'll be showing you construction WIP bits as a taster.  The resin is highly detailed so will benefit from a careful paint job.  I did consider shaving off the raised details and using the Eduard pre painted bits, something I did on the Trumpeter F-100F but this time decided to have a go at painting them.  Following the base coat of grey, the relevant areas were painted white before the black was sprayed from directly above, this meant that there would be no over spray on the sides of the switches.


  Then a Flory Models skinny sanding sponge and a scalpel blade were used to highlight the knobs and dials, they were then touched up with a fine brush.  Many switches were black or had fine white writing on them so a tiny blob of Vallejo black was placed on top.


  After that, a filter using diluted AK Interactive Winter Streaking Grime was applied followed by a pin wash consisting of Abteilung Shadow Brown.  Here is the finished result, I'm quite pleased with it to be honest however I do prefer the pre painted consoles so will be using those next time.


  The instrument panels were a mix of Aires and the Eduard colour etch.  I know some say its cheating but I disagree, I think the results are stunning and in my mind is no different to using decals!


  Now for the nightmare!  There are bits of the fuselage that need to be removed in order that the resin tub fits, fine, I get that.  But I didn't expect the fight, especially as the F-100F cockpit just dropped in.  ARRGGHHHHH!  Anyway, I got there in the end but its not as neat as I would like!


  Having chopped up the fuselage I painted up the Aires resin avionics panels, even though they've come out looking really nice I wouldn't do it again, I have a repair job where I've thinned the fuselage too much!


  In order to facilitate the fitting of the nose wheel bay I had to scratch built the bay roof from really thin plastic card plus Archer rivets.  It was then enhanced with Eduard photo etch, note this is now a brass colour!  Much better than the plated stuff.


  Attention then turned to the wings, the wheel bays were tarted up with more Eduard brass.  The larger parts were tarnished so I polished them with a skinny sanding stick.


  That's how things stand at the moment.  Next week I'll be putting the airframe together and hopefully I'll be getting the painting started which I am really looking forward to.

  One last thing before you go, part 1 of my Tamiya Corsair article is in the latest issue of AIR Modeller.  After all these years I've finally managed to get on the front cover which I am chuffed to bits with as this magazine is pure modelling porn!  This part covers the cockpit and engine plus the main construction. Painting and weathering will be in Part 2 scheduled for Issue 52.


  So that's it for now.  Don't forget to check out Scale Aircraft Weathering if you haven't seen it and if you have something we could all share that would be awesome.

So until next time, all the best and happy modelling.

Jamie